


With the help of the troubleshooting guide listed below, you will learn simple methods to enable Ethernet on Windows 10:
Well, if you cannot connect to the internet via an Ethernet cable, you must troubleshoot the issue. Once you open the Network & Sharing Center, you will notice that the PC does not recognize the ethernet connection.
Try accessing the internet while connected via WiFi with the same connection. Then, you’ll be able to browse the internet again, indicating that the issue was caused by incorrect network configuration, corrupt or outdated network drivers, damaged or faulty ethernet cable, hardware issues, and so on.
Users who prefer Ethernet over WiFi are affected by this problem because they cannot connect to the Internet via Ethernet cable. Unfortunately, ethernet not working in Windows 10 is a common issue after updating or upgrading to Windows 10. Fortunately, there is a slew of patches available that appear to fix the problem.
So, without further ado, let’s get started!
Table of Contents
How to Fix Ethernet Connection
Method 1: Run Network Troubleshooter
Method 2: Reset the Ethernet Adapter
Method 3: Enable Ethernet Device and Update Drivers
Method 4: Enable Ethernet Connection
Method 5: Temporarily Disable Antivirus or Firewall
Method 6: Flush DNS and Reset TCP/IP
Method 7: Change Power Management Settings for Ethernet
Method 8: Use Google DNS
How to Fix Ethernet Connection
Firstly, make a backup just in case something goes wrong. Before proceeding, make sure to complete the following basic troubleshooting steps:
1. Connect the ethernet cable to a different port on the router because the specific port may be broken.
2. Because the cable itself may be damaged, try a different one.
3. Unplug and reconnect the power cord.
4. Connect the ethernet to another PC to see if the problem has been resolved. If the ethernet connection works on the other PC, your PC’s hardware may be damaged and must be repaired.
Method 1: Run Network Troubleshooter
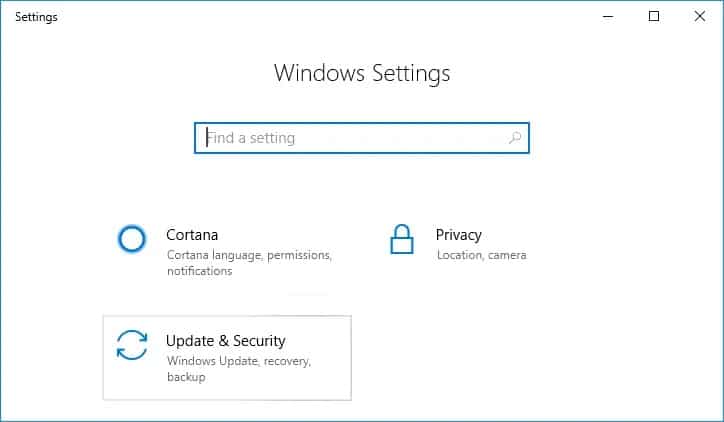
1. Press Windows Key + I to open Settings, then select Update & Security.

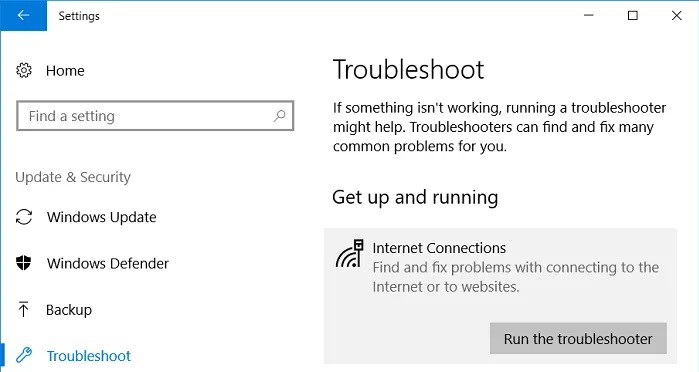
2. From the left-hand menu, choose Troubleshoot.
3. From the Troubleshoot menu, select Internet Connections and then Run the Troubleshooter.

4. Follow the on-screen instructions to launch the troubleshooter.
5. Reboot your computer to save your changes.
Method 2: Reset the Ethernet Adapter
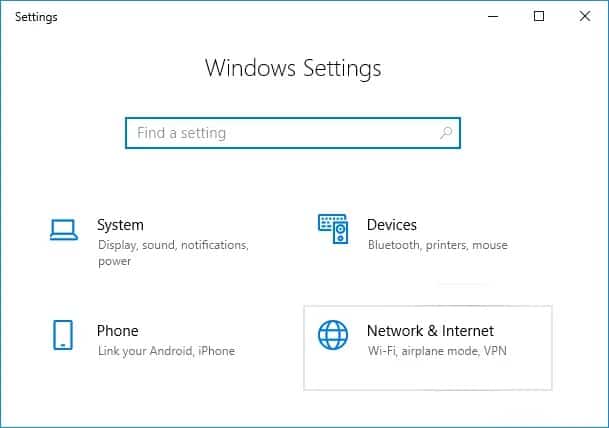
1. Press Windows Key + I to open Settings, then click on the Network & Internet icon.

2. From the left-hand menu, select Status.
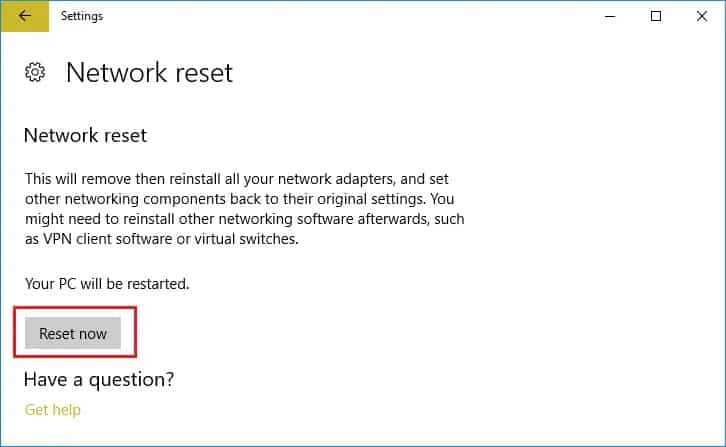
3. Scroll to the bottom of the Status section and select the Network reset link.


4. On the Network Reset page, select the “Reset Now” button.

5. Reconnect the Ethernet cable to the PC to see if you can enable Ethernet on Windows 10.
Method 3: Enable Ethernet Device and Update Drivers
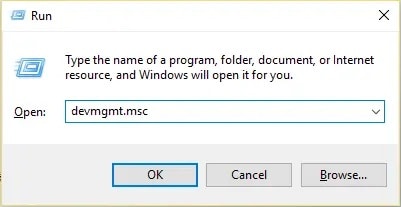
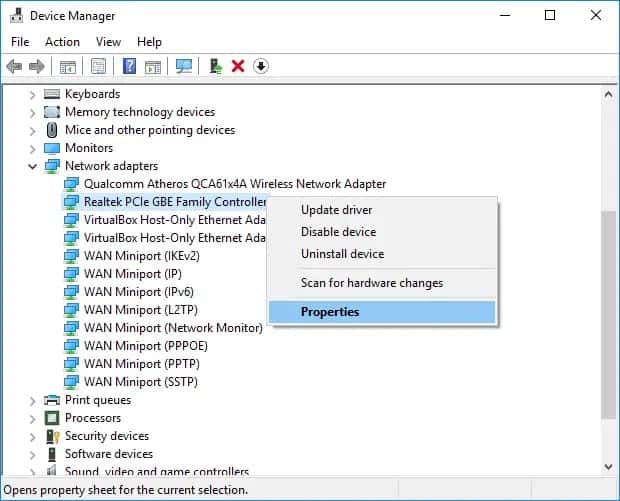
1. Open Device Manager by pressing Windows Key + R, then typing devmgmt.msc and pressing Enter.


2. Expand Network Adapters, then right-click your Ethernet device and select Enable from the menu that appears.
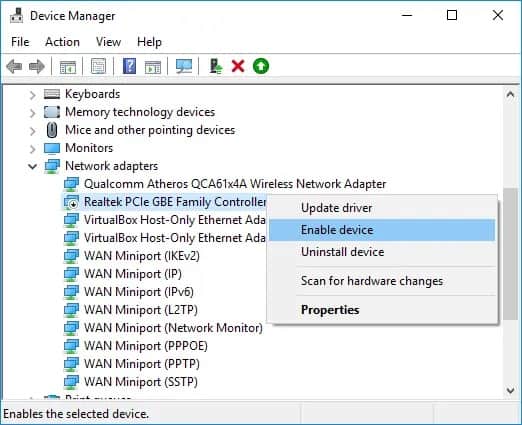

Note: If it is already enabled, you can skip this step.
3. Right-click it once more and choose Update Driver.
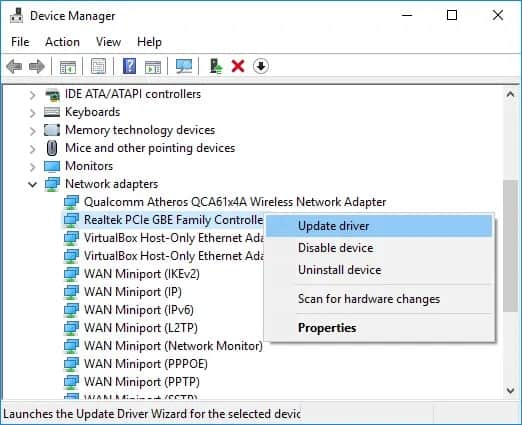
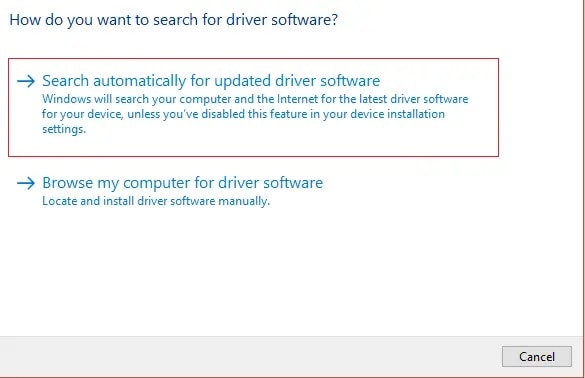
4. Choose “Automatically search for updated driver software” and allow it to install any new drivers that become available.

5. Reboot your computer to save your changes and check again if Ethernet is enabled in Windows 10.
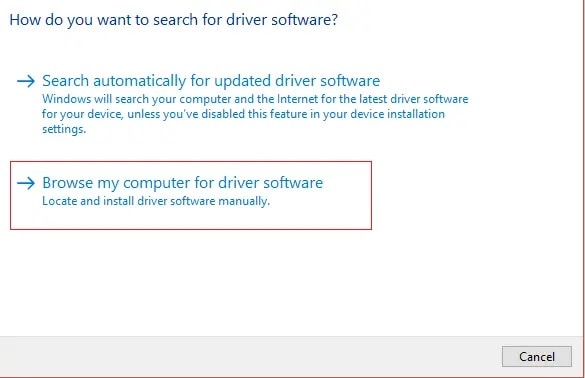
6. If not, go back to Device Manager, right-click on your Ethernet device, and choose Update Driver.
7. This time, choose “Browse my PC for driver software.”

8. Now, choose “Let me select from a list of available drivers on my computer.”
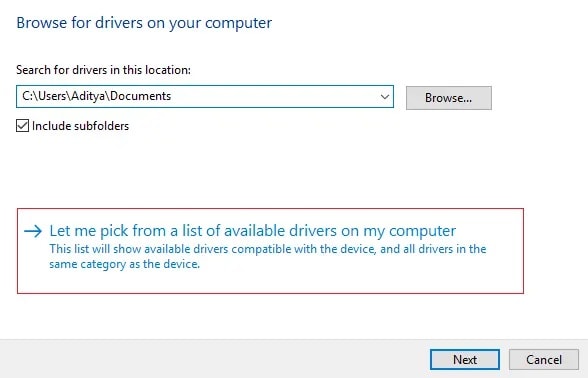

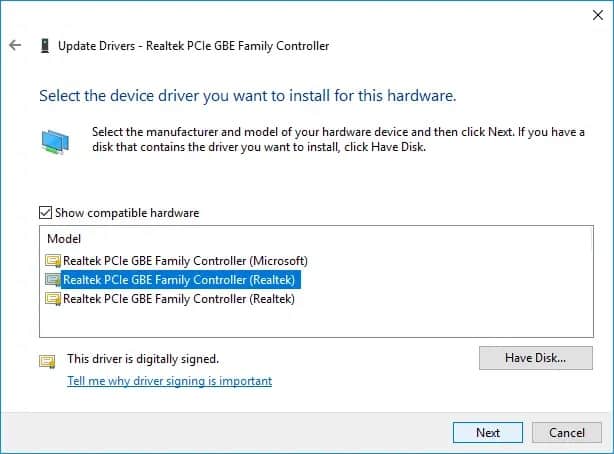
9. Click the Next button after selecting the most recent Realtek PCIe FE Family Controller driver.

10. Now, after the new drivers have been installed, restart your computer.
Method 4: Enable Ethernet Connection
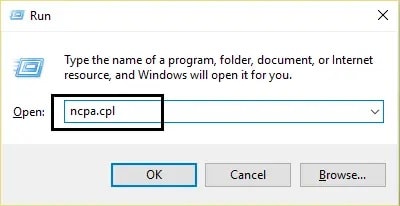
1. Press Windows Key + R to open Network Connections, then type ncpa.cpl and press Enter.

2. Right-tap on the Ethernet connection and choose Enable from the pop-up menu.
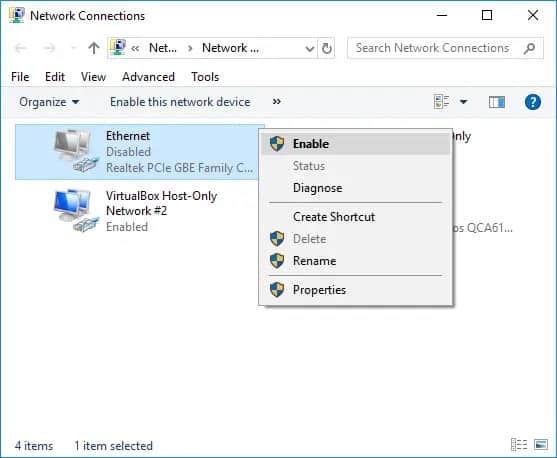

3. This will reactivate the Ethernet connection; reconnect to the Ethernet network.
Method 5: Temporarily Disable Antivirus or Firewall
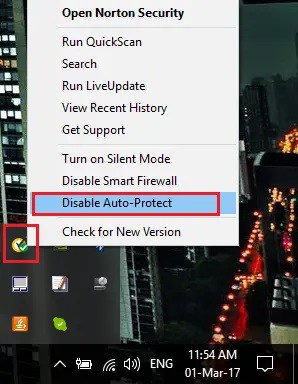
1. Right-click the Antivirus Program icon in the system tray and select Disable.

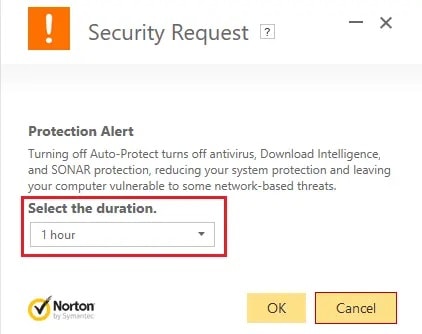
2. Define the time frame for which the antivirus will be turned off. Choose the shortest time frame possible, such as 15 or 30 minutes.

3. Next, reconnect to the Internet to see if the error has been resolved.
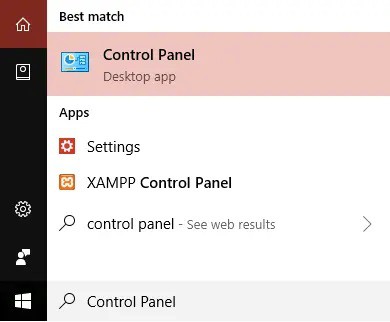
4. Type control into Windows Search and then select Control Panel from the search results.

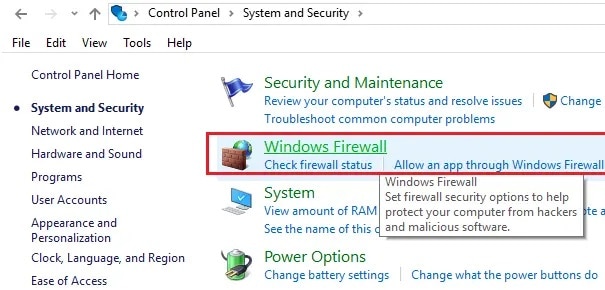
5. Next, select System and Security, followed by Windows Firewall.

6. Choose to Turn Windows Firewall on or off from the left window pane.
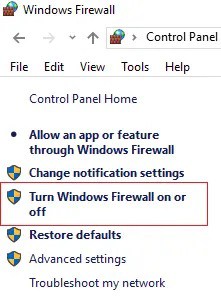

7. Select Disable Windows Firewall and restart your computer.
Connect to the internet once more to see if you can resolve the Ethernet Not Working in Windows 10 issue. If the primary method does not work, make sure to go through the steps again to turn on your Firewall.
Method 6: Flush DNS and Reset TCP/IP
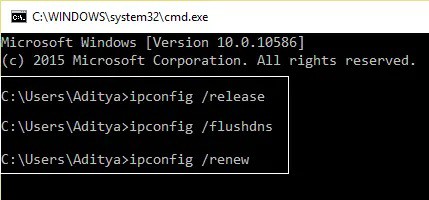
1. Right-tap on the Windows button and select “Command Prompt(Admin).”


2. Then, type the following commands, pressing Enter after each one:
ipconfig /release
ipconfig /flushdns
ipconfig /renew

3. Again open Admin Command Prompt & type the following, then hit enter after each one:
ipconfig /flushdns
nbtstat –r
netsh int ip reset
netsh winsock reset
netsh winsock reset catalog
netsh int ipv4 reset reset.log
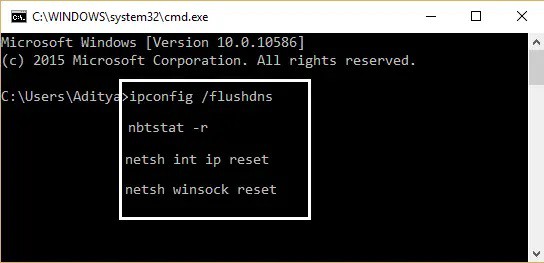

4. Reboot to make the changes take effect. Flushing DNS appears to activate Ethernet on Windows 10.
Method 7: Change Power Management Settings for Ethernet
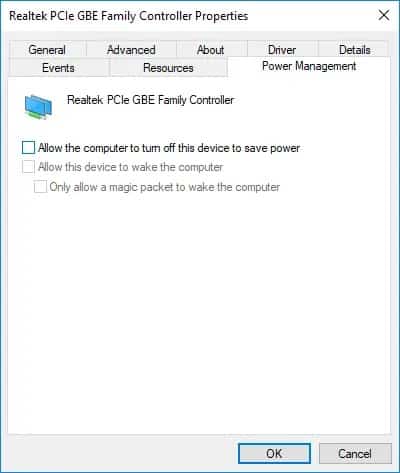
1. Open Device Manager by pressing Windows Key + R, then typing devmgmt.msc and pressing Enter.

2. Expand Network Adapters, then right-click and select Properties on your Ethernet device.

3. Select the Power Management tab in the Ethernet Properties window.
4. After that, uncheck the box next to “Allow the computer to turn off this device to save power.”

ALSO SEE: Change Netflix Download Location
5. Click Apply and then OK.
6. Reboot your computer to save your changes.
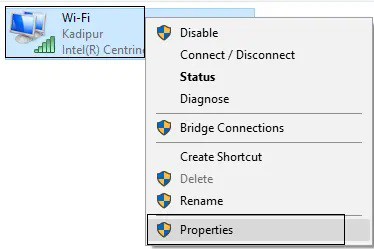
Method 8: Use Google DNS
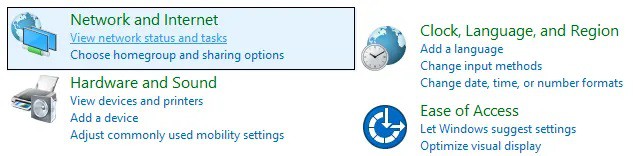
1. Open the Control Panel and navigate to Network and Internet.

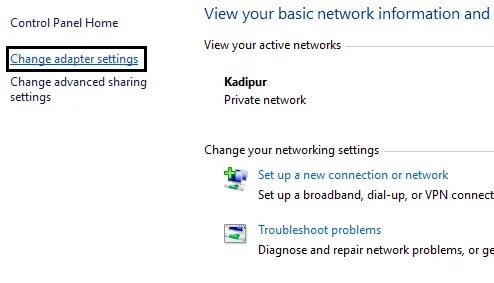
2. Next, navigate to Network and Sharing Center and choose Change adapter settings.

3. Choose your WiFi, then right-click it and select Properties.

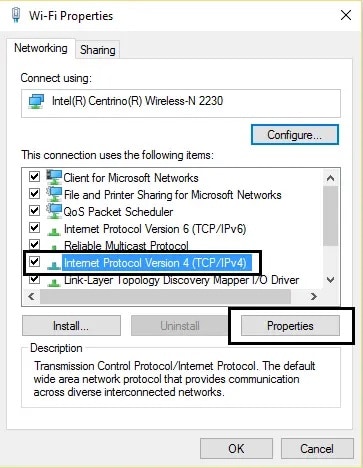
4. After selecting Internet Protocol Version 4 (TCP/IPv4), click Properties.

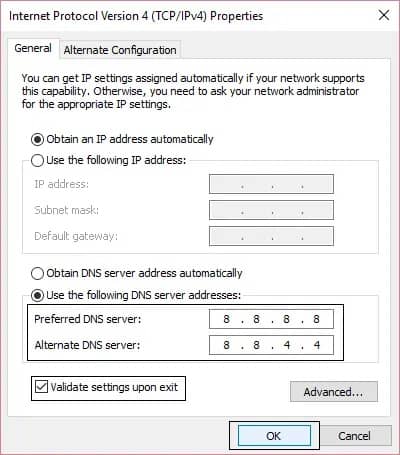
5. Approved “Use the following DNS server addresses” and enter:
Preferred DNS server: 8.8.8.8
Alternate DNS server: 8.8.4.4

6. Close everything, and you should be able to resolve the Ethernet Not Working in Windows 10 problem.
That’s it; you’ve successfully fixed Ethernet not working in Windows 10. So, if you have any issues with this article, please leave them in the comments section below.