


You might want to Download All Photos From iCloud to PC as an extra backup, free up storage space in your iCloud account, or for other reasons—the steps to choose and download All Photos from iCloud to PC are listed below.
Download Photos From iCloud to PC
On iCloud, you may have noticed no ‘Download All’ or ‘Select All’ button. You will also be unable to use your mouse to select Multiple or All Photos on iCloud.
If you have thousands of photos in your iCloud account and want to download them all to your Windows computer, this can be a problem.
Fortunately, there is a keyboard shortcut to select All iCloud Photos, and two different methods to Download All Photos from iCloud to your Windows computer are provided below.
1. Download All Photos From iCloud to PC Using Keyboard Shortcut
If you want to download fewer than 1,000 photos from iCloud to PC, you can use this method to select and download up to 999 photos from iCloud to PC.
If you attempt to download more than 1,000 photos, proceed to the following method described below in this guide.
1. On your Windows computer, navigate to icloud.com.
2. Sign in to your iCloud account using your Apple ID and Password.


3. After you’ve signed in, click the Photos icon.


4. In iCloud Photos, navigate to the Photos tab and select the First Photo.


5. Hold down the Shift, Ctrl, and Alt keys while pressing the Down Arrow Key to select All iCloud Photos.
Please keep in mind that you can also scroll down to the bottom of the page and click on the Last Photo?
6. After you’ve selected All Photos, click the Download icon to begin the process of downloading all iCloud Photos to your computer.
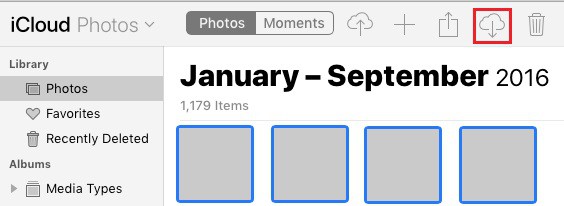

Unless you change the default settings, all iCloud Photos will be downloaded to your computer’s “Downloads” folder.
2. Download Photos From iCloud to PC By Using iCloud For Windows
The merely way to download more than 1,000 photos from iCloud to your computer is to download & install the ‘iCloud For Windows’ program on your computer.
1. Install the iCloud For Windows app on your computer.


2. When the download is finished, double-click the downloaded iCloud Setup file and follow the on-screen instructions to install iCloud For Windows on your computer.
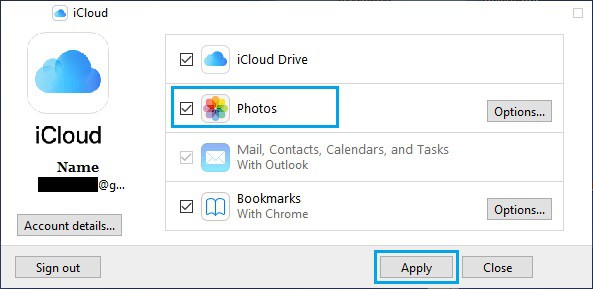
3. Sign in to your iCloud account by entering your Apple ID and Password when prompted.


4. On the next screen, click in the little box next to Photos to select the Photos option.

Select iCloud Photo Library from the pop-up menu and click Done.
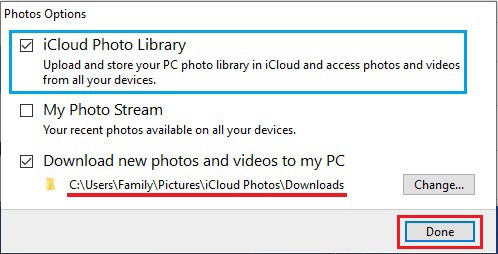

Would you please keep in mind that you can change the location of your iCloud downloads by clicking on Change?
5. Click Apply to begin the process of synchronizing all iCloud Photos to your computer’s Downloads folder.

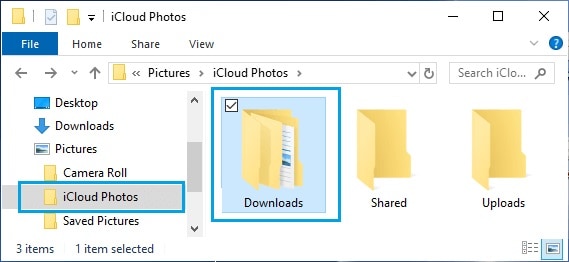
6. After you’ve downloaded all of your iCloud Photos, launch File Explorer on your computer.


7. In the File Explorer window, in the left pane, select the iCloud Photos tab.
Click the Downloads Icon in the right-pane.
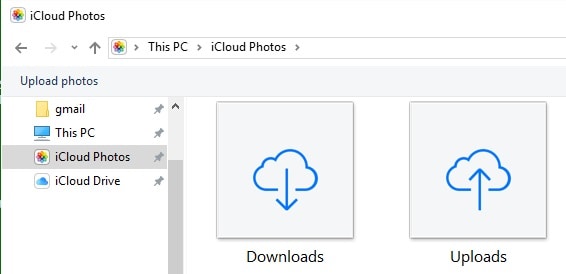

8. On the following screen, click the Downloads folder to see all your iCloud Photos organized into subfolders.

You can create a backup by copying the entire Downloads Folder to your USB drive, desktop, or any other location on your laptop.
Add iCloud to Windows Start Menu or Task Bar
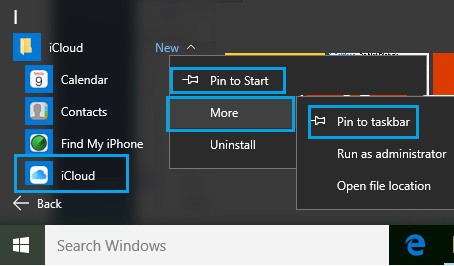
To make it easier to access iCloud, add the iCloud icon to the Taskbar by clicking on the Start button > right-clicking on iCloud > More > Pin to Taskbar.

Necessary: If you intend to disable iCloud Photos, make sure to copy all of the photos from Downloads to a different folder.