


In this guide, you will learn to create a One Page Landscape document in Microsoft Word 2019 or 2016. Follow the simple steps outlined below.
1. Firstly, place the cursor at the very start of the page you want to convert.
(In our example, we will use page 2)
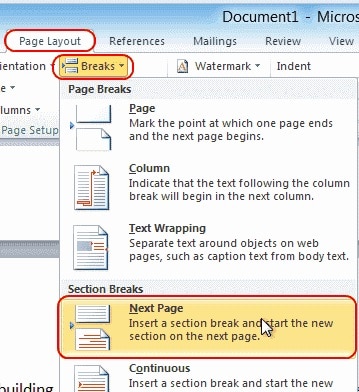
2. Choose “Layout” or “Page Layout” > “Breaks” > “Next Page” to create a section.


3. Select the “Page Layout” tab, then choose “Orientation” > “Landscape. “
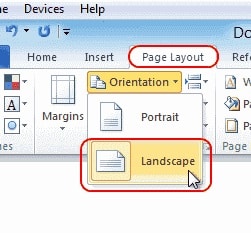

It effectively indicates that all pages following the break you made in step 2 are landscape. Thus, pages 2, 3, 4, and 5 in our example are in landscape format. Because we only want page 2 to be displayed, any subsequent pages must be converted to portrait.
4. After that, move your cursor to the very beginning of the next page (in our example, page 3) or the next page you want to stay in portrait mode.
5. Choose “Page Layout” > “Breaks” > “Next Page” just like in step 2 to create another section.

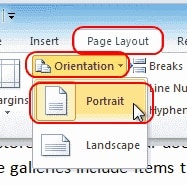
6. Choose the “Page Layout” tab, then choose “Orientation” > “Portrait. “ It will make the rest of the document shown in the portrait.

Final Words
Dear Guests, You have now created a single-page landscape in Microsoft Word 2016 and 2013. So, if you have any questions or concerns about the Word one page landscape, please leave them in the comments section below!
ALSO READ:
Extra Tip: If you’ve a header on your first page that you don’t want to appear on the landscape page, you can do the following (after you’ve made the page landscape):
1. Select “Edit Header” from the context menu when you right-click the header.
2. Remove the highlight from the “Link to Previous” button.
3. Remove the heading from that page. It should remain on the first page.