


The HEIC is the default photo format on the iPhone for a good reason. This only uses half the file size of a JPEG image and helps save a ton of storage. However, it’s not compatible with various devices and websites. Therefore obviously, there comes the time when you have to convert at least some of your captures to a more widely-used format. Here, We already have a guide on Converting HEIC images to the JPG format. This conversion procedure for that is as simple as copying and pasting the pictures to the Files app. Precisely what about the PNG format? Not as easy.
In case you want to convert your photos from HEIC to PNG, you can use any myriad of online conversion tools or apps out there. However, they pose issues to your privacy and are quite inconvenient to use as well.
That is why I’m going to talk about a method that uses nothing but your iPhone to perform HEIC to PNG conversions.
Create HEIC to JPG Shortcut.
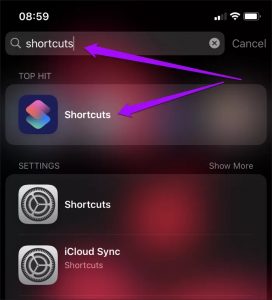
To convert HEIC images to the PNG format using your iPhone, you must build a shortcut using the Shortcuts app. In case you don’t have the Shortcuts app installed, you can get it from the App Store.
Instantly, building the Shortcut doesn’t require you to do anything crazy. As far as you follow the steps below, all it takes is a few minutes to add and tweak the actions needed to convert the images.
Once you have built the Shortcut, it can convert images separately, and you can use it process HEIC images in batches as well. Therefore consider it time well spent.
Step 1: Start the Shortcuts app on your iPhone.
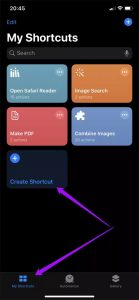
Step 2: Switch to the My Shortcuts tab, and tap Create Shortcut. On the New Shortcut screen that shows up, now, tap ‘Search for apps and actions’ at the bottom of the screen.

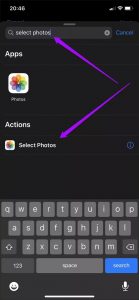
Step 3: Now, Search for and add the actions listed below in the following order:

- Select Photos
- Convert Image
- Save to Photo Album
Step 4: Make the following changes to the actions that you just added:
- Picked Photos – expand the movement and turn on the switch next to Select Multiple
- Convert Photos to JPEG – Now, change the output format from JPEG to PNG
- Now, Save Converted Images to Recents – specify a destination album (in this case, I have selected a collection named PNG).
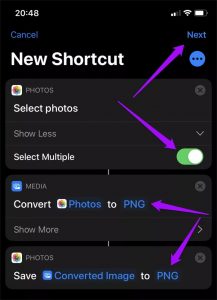

- After that, tap the Next.
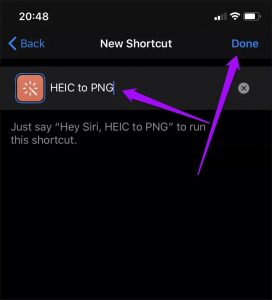
Step 5: So, Add a name for the Shortcut, such as HEIC to PNG. Now, Tap Done.
This’s it. The Shortcut is live and ready to go.
HEIC to PNG Shortcut in Action
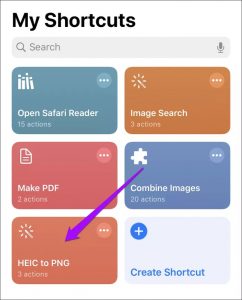
To begin converting HEIC images to the PNG format, tap the Shortcut that you just created via the Shortcuts app. It is listed within the My Shortcuts tab.
Alternatively, you can run it through the Shortcuts widget in Today View or activate Siri and say, “Hey Siri, <shortcut name>.”
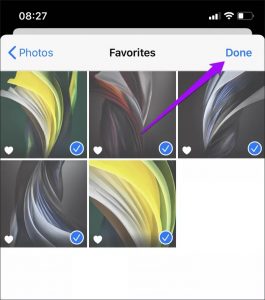
At the image picker that shows up, navigate to an album, and choose the photo or photos for conversion; you can pick as many images as possible.

So, Once you have selected the image or images, tap Done.
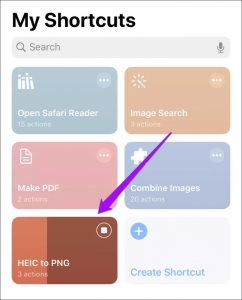
Our shortcut tile within the Shortcuts app will fill up as it goes into each stage of the conversion process. Quite useful when converting lots of images.

After the Shortcut converts all the selected files, you can find the PNG images in the relevant Photos application album, or underneath the Recents album or All Photos tab in case you didn’t specify an output album while building the Shortcut.
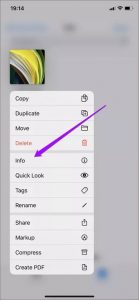
In case you want to confirm the output file format, copy and paste any of the converted images to a place within the Files app. Once you have done that, long-press the image and tap Info to check the file format.
As far as you added and modified the actions within the Shortcut appropriately, you should have no issues converting HEIC images to the PNG format. If required, you can always edit an incorrectly built alternative by touching the horizontal ellipsis symbol over the shortcut tile.
Also, Check :
1. Instagram Videos
2. Anime Wallpapers
Start Converting
So, Converting HEIC images to the PNG format gets ridiculously easy once you have created this simple Shortcut. Therefore the next time you can’t use your HEIC photos for compatibility reasons, you now know what to do.
One downside — converted PNG images can take up a ridiculous amount of storage space (sometimes multiple times the size of the HEIC originals). In case storage is a concern, you should look for better options.