


All of the major video game systems are supported by RetroArch, which is a multi-system emulator. We have everything from the Atari Lynx to the Neo Geo Pocket Color to the WonderSwan and everything in between! It’s a free and open-source emulator for all major operating systems. Instead, this guide is for Android users. Retroarch Cores Download – User Guide will be discussed in this article. Let’s get this show on the road!
Android users have a major advantage because RetroArch supports every video game platform. Unfortunately, only a few of the most popular systems are supported by single-system emulators now on the market. As a result, you may find yourself in a situation where you are forced to use RetroArch.
RetroArch is best suited for Android tablets and Chromebooks that have access to the Play Store. In addition, RetroArch, unlike other single-system emulators, performs well on huge displays.
Because RetroArch wants to do everything and cook your meal simultaneously, it’s a downside. It’s stuffed to the gills with options and possibilities for personalization. The result is an unsatisfactory experience for the user. For newbies, RetroArch can be a bit of a challenge. However, that’s precisely why I wrote this guide. RetroArch should be a breeze for everyone now that I’ve made it easier for everyone to use. In addition to the Mac version, the Windows version is excellent as well.
You can even find RetroArch for download in the Google Play Store.
Top Retroarch Cores List for Android
Game Boy Advance – mGBA
Game Boy/Game Boy Color – Gambatte
PlayStation – PCSX-ReARMed
Nintendo (NES) – Nestopia
Nintendo 64 – Mupen64Plus
Sega Genesis/Game Gear – Genesis Plus GX (PicoDrive from Sega 32X games)
Super Nintendo (SNES) – Snes9X
Sega Saturn – Yabause (very strenuous performance-wise)
Configure Retroarch Cores
The ROMs & ISOs for your games will need to be installed on Android for it to work with your cores. Again, it’s important to note that these should only be copies of games you already have.
The games can be loaded one by one by navigating to the “Load Content” option on your device. From there, you’ll need to figure out how to get there. Instead, you can create playlists for your music.
Tap the Playlists icon if you want to do this (middle option at the bottom of your Retroarch screen). Then, click on “Scan Directory” after that.
Select “Scan This Directory” after selecting the directory where your ROMs are stored. There will be separate “Playlists” folders for each console now, as well. From this menu, you can also access and manage your games.
Controls for Each Core | retroarch cores
There’s a lot to take in here. Doing nothing is fine if you’re only using the touchscreen because of the customizable on-screen touch displays that each core provides for gaming control. However, there are several things that you may want to change if using a controller.
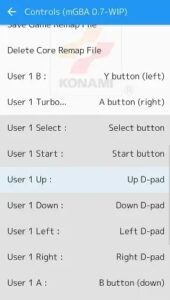

Controls and other settings can be altered at the core level. Using “Load Core” and “Load Content,” you must first load the core of the game (or from your playlist).
Afterward, you should be able to access the “Quick Menu” option from the Retroarch menu. When you press it, go to “Controls” and scroll down to adjust the controls for the game you are playing.
Fortunately, you can preserve these controls so that they may be applied to all games on the core platform (Save Core Remap File). On the other hand, it could potentially just be a single game (Save Game Remap File). You can then return to your game by selecting the Save option that best matches your needs.
PS1 or PS2 Emulation and BIOS
Generally speaking, BIOS is not an issue when running emulators and games. Because the emulators supply the necessary files. The first thing an emulator looks for is the BIOS file. There’s also a different BIOS file needed depending on where you’re playing the game in the world.
However, if you want to play PS1 and PS2 games, you’ll need to find the BIOS files yourself (you can find them online). Put these in the “system” folder of Retroarch on your Android smartphone and then play them.
Retroarch’s guide on PS1 emulation is also a good source of information. Even if you are playing on a mobile device, the same restrictions apply. When it comes to BIOS, these are the ones you’ll want to have on hand:
- scph5500 (NTSC – Japan)
- scph1001 (NTSC – US)
- Also scph5502 – (PAL – Europe)
- scph5552 (PAL – Europe)
Shaders (screen filters) | retroarch cores
If you desire your screen to look better, you can use screen shaders (also known as screen filters in other emulators). RetroArch’s default shader is a simple one that merely adds a slight blur to the screen. What if I told you that you could do better than this? Please demonstrate your ability to do so:
1. During gameplay, Tap ![]()

2. Then choose Shader Preset > shaders_glsl.
- Slang is an acronym for what? For example, GLSL shaders are compatible with smartphones and tablets. The new Vulkan renderer and Slang are both shader compatible. If you’re using an Android device, both of these apps should work without any issues. Because of this, it doesn’t matter which one you choose.
3. The shaders folder has packed with subfolders, so you’ll have a hard time finding what you need. Explore these folders for a bit of a while. To use a shader, select the “glslp” file for it when you’re ready to experiment with it.
4. To apply the shader to your game, click Apply. As a result, all games now use the shader you’ve chosen.
The Shaders | retroarch cores
Shaders are also a massive part of RetroArch’s repertoire. I’m guessing there are at least 50 currently. You won’t even see the minute changes between most of them on your smartphone’s small screen. For your convenience, I’ll recommend two shaders.
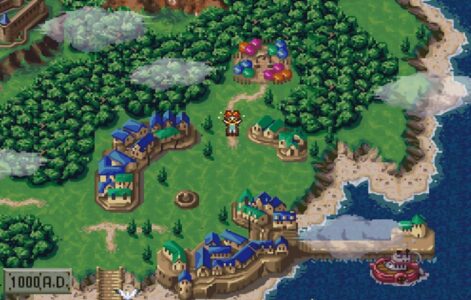
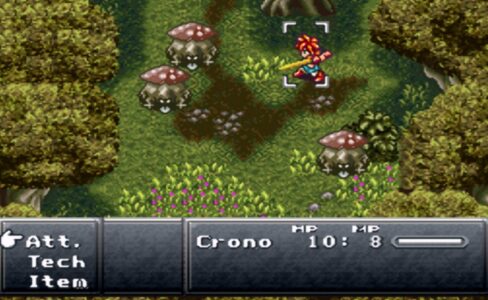
hq4x: attempts to avoid blurring by rounding pixels together. It can be found in hqx > hq4x.glslp. hq4x is a preferable option if you find the eagle to be overly smooth or fuzzy. Here is a sample of it with Chrono Trigger (SNES) and also Shantae (Game Boy Color):

If your Android device is even struggling a bit with the hq4x filter, then try hq3x instead. Even further, hq2x would also be perfect for really slow devices.
eagle: a traditional shader that blurs and smears pixels together. Even in eagle > super-eagle.glslp, it can be discovered. The eagle is a good choice if you find hq4x (above) to be excessively sharp. Using Chrono Trigger (SNES) and Shantae as examples, let’s examine how it works (Game Boy Color):

These huge screenshots give you an idea of what the eagle will look like. Remember that your smart phone’s screen is smaller, and hence it will appear crisper.
Deleting a core
RetroArch’s interface also makes it easy to download a core that you don’t want. For example, you can remove a core by following these instructions. Unfortunately, there are a lot of processes, and it’s a pain to go through.
1. On the Home tab, start to Load Core, then choose the core you need to delete.
2. You should see the header and the core you selected at the top of the page. Next, scroll to the bottom of the Home menu and select Information.
3. On the Information screen, you have to select Core Information.
ALSO READ: Steam Downloads Faster
4. If you go all the way down in Core Information, you’ll come across an option to Delete core. Remove the core by clicking on it right now.
Conclusion
Folks, that’s all there is to it! To that end, I hope you find this retroarch cores article exciting and valuable. If anyone has any other queries or concerns about this essay, please let me know. Finally, let me know what you think about the space provided here. Our response time is relatively short, so please be patient with us.