


A crucial aspect of your computing experience is backing up your documents. If you’re a frequent computer user, you must back up your data or save it for future use before backing a clean system install. However, several third-party apps for mac users can be found online that are designed to make backup games simple and effective. It might not be easy to choose the app that best matches you and your cause out of hundreds of thousands of apps. But don’t worry; we’re here to assist you. We’ll walk you through some of the top backup software options for Mac so you can choose the one that will best meet your requirements.
What Makes Backup Software Necessary?
There are several real-process justifications for backing up your data; some even support that you do it right away. Whether you are an individual wishing to back up data for future use or a company owner, backing up your data protects the protection and safety of your information. Here are all the justifications for purchasing backup software for Mac:
1 – Save data for a future date.
2 – Defense against spam and hackers.
3 – Keep data safe in case of system breakdown.
4 – Avoid performing the same task repeatedly.
5 – A simple data recovery process.
Some Best Backup Software For Mac
Well, we’ve gathered a list of some of the best and most effective backup software for Mac, including built-in, third-party, free, and some paid options. So let’s get started right away!
1. Time Machine
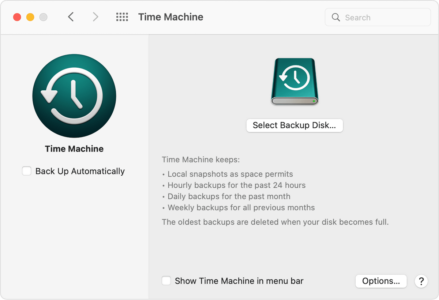

A built-in backup tool offered by macOS is called Time Machine. You have the option to back up your files using this tool manually, or you can allow the system to do it for you automatically. Your documents, emails, apps, images, and other files are backed up to an external hard drive. Either your computer or the drive should be on the same network as your computer. To start backing up your documents using the time machine, follow these steps:
1 – Connect the external drive to the computer.
2 – After that, click the Apple menu bar.
3 – Navigate to System Preferences.
4 – Click Time Machine.
5 – Then, Choose Backup Disk.
6 – Select Use Disk after selecting the external disk you intend to use for backups.
7 – The backup process is about to start.
Although the first backup might take some time, the CPU will handle the process in the background. That is, while your Mac is being backed up, you may still use it normally. The navigation bar displays the progress. You can select to manually certain backup objects using this menu bar the following time you plan to do so. However, remember that the oldest files and folders are deleted to make way for backing up new files if your backup disk is full.
2. Backing Up Via The Terminal
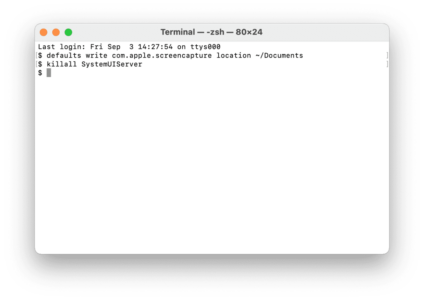

You may also back up your files and folders more easily using macOS by using the terminal. Well, the fact that the image file you create is impervious to any potential virus or malware infection is one of the key benefits of this backup strategy. Due to this,
1 – To open Spotlight, press Command + Space on your key.
2 – Enter Terminal and press enter.
3 – To list all the disk drives attached to your computer, type and enter the diskutil list.
4 – Next, unmount your disk using diskutil unmountDisk /dev/*diskname* to prepare it for backup. Here, substitute the disk name you wish to backup for *diskname*.
5 – To completely clone the chosen disk, type and enter $ sudo dd if=/dev/*diskname* of=*name-of-your-backup*.img.dd bs=512.
6 – To back just a certain folder, use dd if=/dev/*file-path-of-your-folder* for dd if=/dev/*diskname*.
7 – Substitute “diskname” for the name of the disk you want to copy, “name-of-your-backup” for the name you want to give your backup image, and “file-path-of-your-folder” for the precise file path of the folder you want to backup.
8 – To close the terminal when the process is finished, type exit.
Note: You don’t have to unmount the disk before the backup process if you wish to back up a specific file or folder.
3. IDrive

IDrive backs up your data to an Idrive account, a local computer, or an external disk drive. You are granted a set amount of storage space through your IDrive account to save your data on the IDrive server. In addition, free storage space of up to 10 GB is offered. It should be paid for annually for more, though. Once you start using IDrive to back your files, you’ll discover that you can plan additional backups for your favorite day and time. In addition, it can back Time Machine data.
There is a catch, though. In other files, any files and folders that are deleted from the Time Machine will also be deleted from the IDriver server. In case anyone was wondering, the files kept on the IDrive server are 100 percent secure. For backing up your files on the servers, it employs the 256-bit AES data encryption protocol. In other words, it will take a third-party user 2256 attempts to decode this key before they can gain access. This key is not located anywhere on the IDrive server!
4. Disk Drill

The byte-to-byte backup feature in Disk Drill is well-known. To back up every file on your disk drive entirely and “byte-to-byte,” the backup strategy builds a disk image. You can scan this image file once the backup process is finished to search for any missing data that may have been deleted from your original disk drive. The capacity of Disk Drill to search and recover lost data is thus another noteworthy feature. Nevertheless, only some files can be fully recovered.
The number of times a disk sector has been overwritten often affects the file recovery process. Therefore, files that have been overwritten a few times just get lost in time and cannot be recovered. However, if you’ve backed up your files using Time Machine, you may be aware that older files are automatically deleted whenever the disk space is filled to leave a place for backing up new files. With only a click of a button, Disk Drill may be used to recover these previously deleted files from your backup disk successfully.
You may download and use the free app Disk Drill right away. However, you must upgrade to a pro edition if you wish to recover deleted files or clone your disk drive. And that has certainly been paid. However, the scanning process before recovery is free. Therefore, to upgrade to the pro version if the desired data can be recovered, you may first scan your disk drive for any lost files after it previews the list of files that can be recovered.
5. ChronoSync
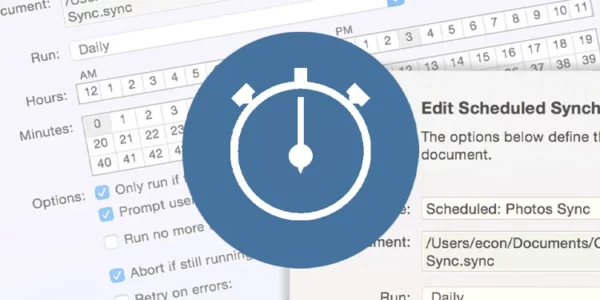
ChronoSync enables you to back up your files and folders to an external hard drive or the cloud. Despite being a paid app, you may still try it out for ten days without paying anything. ChronoSync also uses the BlackBaze B2 server for the online backup process to guarantee a quality job. Your online backup files may be recovered and shared. However, none of them stand out as their key features. Creating a bootable backup file is what ChronoSync is renowned for. That is, you can boot your system using Chronosync’s bootable file if, for some reason, it malfunctions and cannot be restarted.
You must be aware that ChornoSync offers two kinds of bootable backups. The first one, mirrored bootable backup, copies the complete system volume that has been backed up. However, every file on that computer is deleted when you boot another computer from this backup file. However, the second one, a conventional bootable backup, starts the second computer without erasing its files or folders.
6. Backblaze
Another backup app registered in California, USA, is Backblaze. Backblaze differs from other backup apps in that it offers users a real USB drive with all their files for feature recovery. Back, you will need to pay a little extra for this quick file delivery strategy, but if you return the USB within 30 days, you’ll receive a refund.
Backblaze’s limitless storage space for backing up your product is another noteworthy feature. Although you have to pay more if you want to back up from a second computer, its pricing per device is guaranteed to turn some heads. Nevertheless, because of its reasonable and cost-effective pricing, Backblaze is a fantastic choice for users who have one computer. Admittedly, the backing up process is a little slower than other backup apps. But its pricing, security, and feature for file sharing make it all worthwhile. In addition, you may use BlackBaze to attempt to find your device if you discover that it has vanished.
7. Carbon Copy Cloner 6

A more recent version of the Carbon Copy Cloner series is the CCC 6. The most notable feature of CCC6 is its quicker backup time. You may more quickly clone your system image file and back up either a single folder or the full drive. Well, an external hard drive or another Mac computer can be used for backup. The macOS FSEvents service makes it easier to find new files that are intended to be added to your backup drive. Therefore, CCC6 examines the folders that have changed since the last time you performed a backup rather than scanning the entire disk for tiny changes.
And using the CCC 6 software, some deleted files can be recovered. CCC 6 offers a 30-day free trial so that you may test out all of its features, but to use the app to its full potential, you must finally pay for a subscription. However, the license you buy for a CCC version is backward compatible with earlier releases. In other words, if you buy CCC 6, its license may also be used for CCC5.
8. Acronis Cyber Protect Home Office

Acronis Cyber Protect Home Office provides its user with a backup strategy and serves as an anti-malware and anti-ransomware app. Therefore, the major emphasis is on fending off any dangers from cybercrime that might harm your files directly or indirectly. Malware and ransomware are recognized based on how they behave while dealing with your computer. Furthermore, the Blockchain certification that protects your backed-up data ensures the files’ authenticity and unaltered status. You can back anything from a single piece of data to your full system image.
And while you’re using your computer, all this process may be carried out in the background. To run as a virtual machine, your system image can be changed into a virtual disk format. On the other hand, Acronis Cyber Protect Home Office is a paid app with three membership levels. An Essential plan, an Advanced plan, or a premium package are all available for yearly payment. The latter, which costs the most of the options and includes all the features this app has to offer, is the package.
9. Paragon Backup and Recovery for Mac
Time Machine is said to be three times slower than the Mac software of Paragon Backup. It is claimed that with Paragon Software, backing up 131 gigabytes of space on a Mac Mini only takes about nine minutes. Data backup to any external drive is another essential feature of Paragon Software. That also includes HFS+, exFAT, and APFS. You’ll be given several parameters for creating your backup strategy.
These parameters include scheduling, the backup frequency, and type, among others. As a result, you can conveniently mount your backup drive and browse your stored files and folders. The Paragon Backup software’s features, including creating bootable CDs, are free to use if you select the “Community” plan. However, if you select the “Business” plan, you will also receive certain additional features that are extra and must be paid for. However, remember that the Paragon software does not support the cloud storage service, so you will need to back up your files on an external device.
10. Get Backup Pro
Typically, Get Backup Pro backs up your system to a network-linked storage device or an external disk drive (NAS). You have the option of encrypting your backup data using the Triple DES, AES-256, AES-128, or Blowfish protocols. Three different backup plans are available to users of getting Backup Pro. After you’ve backed up your device for the first time, these techniques operate differently. In this case, the ‘Full’ backup option backs up all the data once again while replacing the old data with the fresh ones. Similarly, the “Versioned” backup procedure backs up all the data anew while maintaining the integrity of the archived data.
Meanwhile, the “Incremental” option backs up the data that was added to your system since the previous backup. In light of the plan, the stepwise approach is the most trustworthy. However, the Incremental plan must be paid for, unlike the Full and Variation options. Every device you use will always have access to the most recent times of your data, thanks to the unidirectional and bidirectional synchronization approach. Not to add, it has a feature that lets you create a bootable backup, which comes in useful if your system fails unexpectedly.
Also, Check:
Final Thoughts:
We hope that our ranking of the best Backup Software for Mac is useful to you. In the comments section below, let me know if you have any other questions concerning Backup Software for Mac.